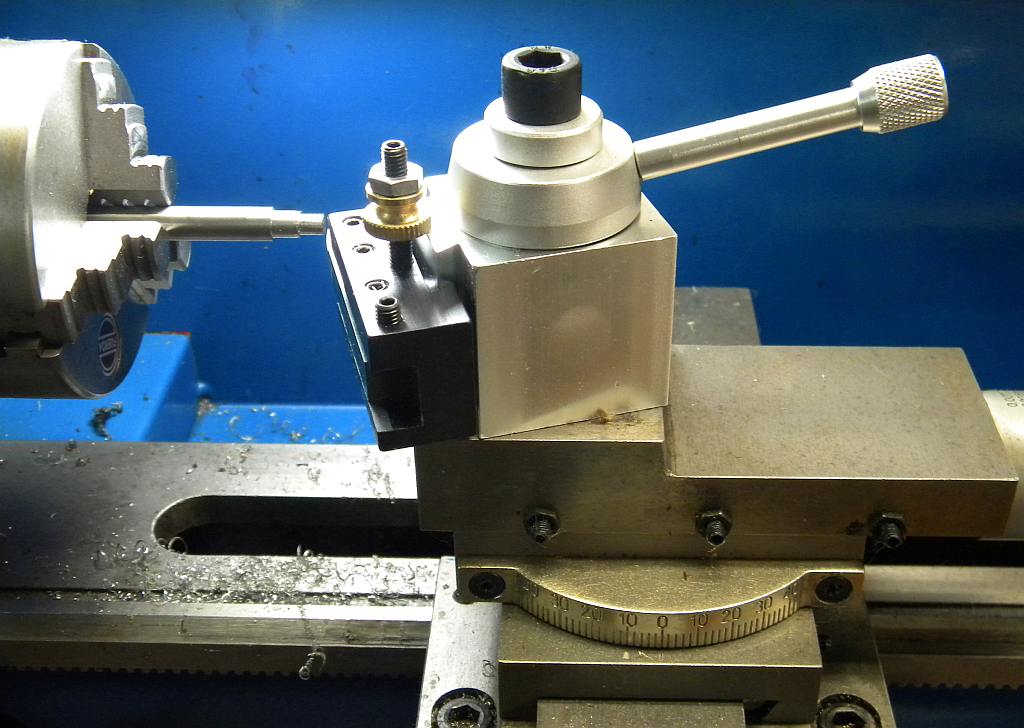
Random Quote

“Only passions, great passions, can elevate the soul to great things.”
-- Denis Diderot

Does the world need another CNC tutorial?

I thought I’d try writing a more personal post and see if anyone is interested in what I have to say.  I also wanted to see if it would be any easier to write.  When I sit down to write for this blog the words often don’t want to come out, even though I can write fairly quickly and easily for work or forums and discussion groups.  I think it might be because of a mild form of stage fright.  I also feel that I haven’t found “my voice” yet, probably because I still haven’t decided if I want this to be a somewhat impersonal “how-to” web site or a much more personal online journal.

I know I haven’t posted any new content in almost three weeks.  Over the last year I’ve been pretty good about meeting my self-imposed goal of posting, on the average, at least one new article each week.  But I’ve been really busy with spring yard work, home repairs and family activities.  I’ve also been trying to spend what little free time I’ve had in my workshop because I’ve been inspired by David Morrow and his web site to finally learn how to use the CNC mini-mill I bought last Fall.

Learning to use the new mill has been a lengthy and sometimes frustrating process because there is so much you have to learn before you can make even a simple part.  I’ve had to:

  • Learn how to use Mach 3, the software that controls my mill.
  • Find a good affordable CAM program and learn how to use it.
  • Learn some basic G-code.
  • Find and learn some new ways of holding the work piece.
  • Shop for engraving bits and some new end mills.
  • Practice by milling lots of pink foam.

I also had to decide what would be a good first project to make, which was harder than you might think.

I’ve spent dozens of hours in front of my computer playing with the software, searching the net, reading, watching videos and asking questions.  The reading and research phase is starting to wind down and I’m glad.  Sitting in front of a computer and figuring out things is what I do for a living and I was reluctant to spend even more time doing it at home.  It’s one of the reasons why it has taken me so long to learn how to use the new mill.

It probably would have been much easier if I’d been able to find a tutorial written for CNC newbies with step-by-step instructions describing how to make your first part.  But there either isn’t one or it’s well hidden.  I’d like to write one but I’m not qualified yet, other than maybe having a pretty good understanding of the problems and questions a beginner might have.

Would anyone be willing to collaborate on one?  I don’t know if we have enough readers yet with CNC experience, but I’d love to be involved in a group effort similar to the one “black85vette” got started on the Home Model Engine Machinist forum.  They worked together to design an easy-to-make steam engine with a well-written set of instructions for teaching basic machining skills to beginners.

Let me know if you’re interested.  Some help putting words down on paper would be nice, but so would suggestions, feedback and a willingness to help answer questions.  The first steps might be developing an outline and coming up with a good first project to make.

– Rob

DeskEngrave


Use a negative radius to put text on the inside of a circle. Use a positive radius to put it around the outside.


DeskEngrave is a free Windows program that makes it easy to add engraving to your parts if you have a CNC mill, router or similar machine.  It will create text using any TrueType font installed on your PC, make it the height or width that you specify and put it on a straight line or wrapped around a radius.  It will also create a DXF file or generate G-code that you can run directly on your machine.

You could also use it to make cut-out, raised or pocketed text, although you’ll need the help of a CAM program.  That’s how I’m going to use it to make street numbers for my mailbox.  You can also import its DXF files into a CAD program if you want to create multiple lines of text or add them to another design.

The program couldn’t be much easier to install and use.  It seems to work very well but there are some things you should know.  The size of your text appears to be controlled only by the height and width boxes on the main screen.  Even though you can change the font size on the font selection menu it doesn’t seem to make any difference.  I’ve also noticed that the size of the text is often significantly bigger than what I specified.  So if size is critical you might want do to a test run and either adjust the size until you get what you want or rescale the DXF with a CAD or CAM program.  You can specify only the height or width of your text, not both.

You also need to set the parameters before you try and run the G-code it generates, otherwise your controller program will probably complain about a feed rate of zero.  Also, the “Precision” and “Dec. Places” settings are important.  I don’t know what the optimal settings are yet, but if you don’t the increase the default settings your font will look like it’s made entirely from straight lines instead of curves.  Click on the help button for more information about those settings.

DeskEngrave is from Deskam.com, which appears to be part of DeskCNC, a maker of CNC software and controller boards.  The program hasn’t been updated since 2000 but this CNC newbie thinks it is still pretty useful.

How to Grind and Use the 'Contrary Finishing Tool'

This excellent article was written by Bob Bickerton, a new contributor to Machinistblog.com. It was originally published to the files section of the Yahoo 7x12minilathe discussion group.

The slowest feed rate on the Mini-lathe is about .004 in/revolution. This is fine for many applications but when you want a nice, smooth turned finish the slowest rate isn’t slow enough. You can set the knife tool to ‘rub’ and that helps sometimes. And, there have been modifications published that allow the slow feed to be reduced, but all require building something for the lathe. Here’s another option that only requires one to grind a HSS tool blank to a different shape. It’s a “Contrary Ground Finishing Tool” described by Frank Burns on page 58 of the Jul-Aug. 1997 issue of Home Shop Machinist magazine. Here’s how I do it.

I turn the OD of the work piece with the usual ‘knife tool’ until it’s about 10 thousandths oversize. Then I mount my ‘finishing tool’ and adjust the cross feed to just skim the surface (about a thou or so). Note the cross slide in feed dial reading. Measure the OD and set the cross slide to remove about half of the still oversize work piece. Measure the OD again, and if everything went well you should have removed half the oversize. If so, set the cross slide to remove the remainder and, presto, you have a nicely turned finish on specification size. If the first pass removed a little more or a little less than half, make an appropriate adjustment before the final cut.


Here’s a picture of some EMT conduit mounted in the chuck of my Cummins 7x12. EMT is welded steel tube and difficult to finish, at least for me. The welded seam can be harder than the surrounding area making it difficult to get a good, smooth finish. The front has been machined with my usual knife tool. The finish doesn’t look to bad but it is rough to the touch.

Here’s that same piece after using the ‘Finishing Tool.’ Hard to tell from the picture but the finish is very smooth to the touch. Because the tool cuts on the front it doesn’t need to be exactly on center height. You can’t cut up to a shoulder because of the geometry.

How to Grind and Use the ‘Contrary Finishing Tool’

Because of the high level of interest in this subject, I decided to show how I grind the tool and then show it in use. Here’s how I do it.

Continue reading → How to Grind and Use the ‘Contrary Finishing Tool’

Jan Ridders' Flame Eater "Marc"

Jan Ridders recently updated his plans for a vertical flame eater engine that he originally made in 2003 as a birthday present for his son Marc.  He made a number of improvements and redrew the plans using a CAD program.  Jan says this engine is “more forceful and noisy” than his Stirling engine models.

This is just one of the many beautiful engines Jan has designed.  You can see them all by visiting his web site, which is in both English and Dutch (look for the buttons to change the language).   Jan makes his plans available for free and you can request a set by just completing this short form.