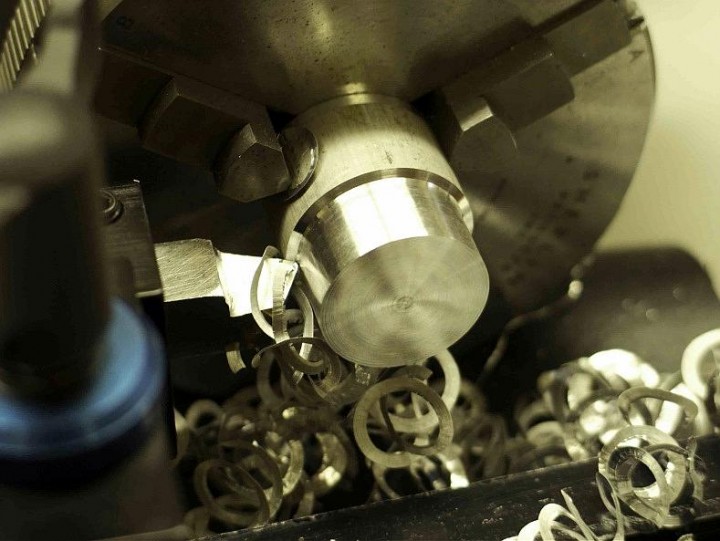
 I’m a believer. As a new guy I totally sucked at grinding lathe tools. It’s almost painful to admit how many stubby, misshapen, multi-faceted, overheated and just plain ugly lathe tools I made back then. The amazing thing is that some of those tools actually worked as well as the pre-ground tools that came with my lathe. I started to believe those guys that tell you, “just get it close and it will work.” Of course, I was too embarrassed to call myself a hobby machinist with those Franken-tools so I bought an expensive set of inserted tip carbide tools that I thought would make a major difference but was disappointed. They couldn’t rough as deep or finish as well as my ugly high speed steel (HSS) tools, at least not on my lathe, so then I believed those guys that tell you, “stick with HSS on a hobby lathe.” Hey, desperation can make you mighty receptive, you know.
Fast forward 15 years and now I believe, after having ground many experimental tools, that the best lathe tool for a hobby-class lathe is a HSS tool with its tip geometry modified to reduce the cutting forces it produces, ground on a belt sander.
Since standard tools are intended for use on industrial lathes their geometry can produce cutting forces that are excessive at times, especially when roughing but this can also affect sizing and finishing cuts. To be clear, cutting force is that force produced by the tip geometry of the tool that must be overcome to make a cut. We can look at it as a continuous resistance generated by the shape of the tool as it is pushed through the material during the cut. A standard HSS tool has a broad, wedge shape and creates a lot of resistance (carbide is even worse), so we must dial down our control inputs (depths of cut, feeds and speeds) to use them. If we alter the tool so it has a narrower included angle it cuts with less resistance, thus lowering the rigidity and power needed to make a given cut.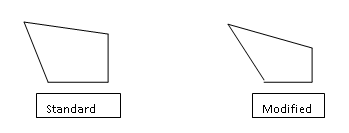 We still have to manage our control inputs but since the cutting forces are lower we would expect to be able to cut deeper, achieve better accuracy in sizing and finishing cuts, and finish better with greater ease before running into the rigidity and power limits of the lathe. And this is exactly what happens.
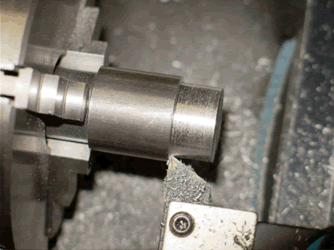
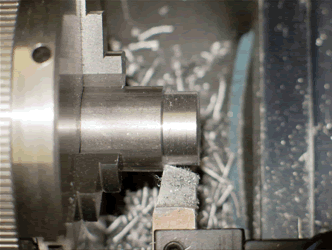
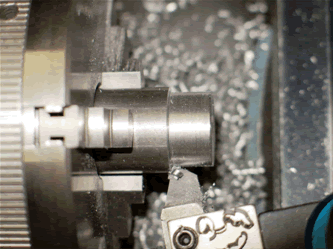
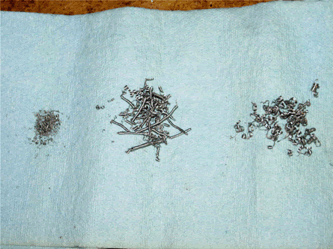
To demonstrate this I took a 0.050″ deep cut in 12L14 mild steel on my admittedly older hobby-class manual mini-lathe using a very good quality inserted tip carbide roughing tool with a new insert, a sharp freshly ground high speed steel (HSS) roughing tool with standard tip geometry ground for steel, and the general purpose tool with modified tip geometry (not optimized for steel) that was ground for this discussion.
As you can see the modified tool performs favorably compared to the standard HSS and carbide tools, and I assure you they size and finish better as well. The trade off for this enhanced performance is a reduction in tip strength but most small lathes are not rigid or powerful enough to break a tip off, even with pretty aggressive cuts so it’s an acceptable trade off.
These modifications are not some deep dark secret. They are simply an alteration to the standard angles in ways that are already known to reduce cutting forces. You just need to know what to change, when and how to change it, and by how much. Grinding these changes into the tool then becomes very simple and will allow you to tailor the tool to your specific lathe and needs.
If this interests you then follow along as we go over basic tip geometry, at least enough to grind a tool with, and discuss how these modifications can be made. I’ll talk you through the thought process used to alter the tool we grind so you get a feel for what you’ll be doing in your shop. Then we’ll grind that tool on a belt sander, pretty much step-by-step, to solidify the concepts. We’ll finish off by showing you the Knife Tool, a facing tool I can highly recommend. Due to the length of this discussion I will break it up into three parts.
Please understand that tip geometry and cutting forces are extremely complex subjects. Entire books are written about this stuff by folks far more knowledgeable than me. I am not an expert on this subject; my goal is to give you only enough information to get you started and I consider this discussion to be a supplement to your reading. Therefore, any opinions, inaccuracies or errors are my own. The angle modifications I am sharing here were derived from experimentation in my shop and work for me and my lathe; your results will vary. These changes are NOT necessary; you can grind standard tools just as easily.
Finally, I am not a technical writer, engineer or pro machinist — just a guy like you — so I will write this in a style and language that I am comfortable with.
Experienced guy warning: Having been a new guy myself I recall the early grinding days well enough to know where the confusion points are. Accordingly, I am going to repeat and re-emphasize some points frequently, in several different ways, so that it clicks for the new guy. This will also be very detailed and necessarily longer because new guys need detail in order to succeed. For you more experienced guys, my apologies for the nausea this creates. Please ignore me and move on.
As always, working with machines and sharp stuff can result in injury or worse. Please be careful and proceed at your own risk.
First, the grinder
The bench grinder is the most commonly recommended tool for grinding lathe tools. This machine tends to cut slow, cut hot and cut facets. It may work in more experienced hands but for the new guy – maybe not the best tool to learn on.
A far better option for grinding lathe tools is a simple belt sander, preferably one that uses 2″ wide belts. These machines are cheap, widely available and surprisingly capable for home shop use. The smaller machines with 1″ wide belts don’t have enough width to grind a tool evenly, the platen is too flexible, the belts wear too quickly, and coarser belts are harder to find.
As a tool grinder the belt sander is almost ideal:
- Belt sanders cut very fast and very cool when you use the right belt and a wax stick lubricant. Average grinding time for a 3/8″ HSS tool is under 4 minutes and less than 2 minutes for a ¼” HSS tool.
- With their wide flat platens they allow for simple tool alignment so facets are easy to avoid. This is far, far, far better than trying to realign a tool to a narrow round wheel that requires frequent dressing.
- Belts are widely available, cheap, and do not require dressing, balancing, or conditioning. They also have a very good service life if used with wax lube.
- Changing grits takes seconds and going from shaping to a mirror finish by stepping up through the grits takes a few minutes. Honing to a final polish is less than a minute away.
- Belts will snap at the splice occasionally, especially if they are old. This will scare the crap out of you the first time it happens but I find that preferable to an exploding wheel. Know also that touching a finger to the edge of a running belt is very, very bad for you.
Most common belt sanders are not perfect in stock form. The OEM table is typically inadequate and needs to be upgraded to a solid table that can be quickly set to precise angles. The table should be made of steel to avoid sharp edges from catching and dragging as you move the tool across the belt.
The stock mild steel platen on these machines typically won’t last long with any serious grinding done on it. I suggest buying a ceramic glass liner you can epoxy onto a flat (preferably ground steel) platen to greatly resist wear from grinding operations. Better known as Pyroceram, these liners are readily available from knife making suppliers for about $20.00 as of this writing. The key thing is that the platen remains flat and does not flex at all. Once the table and platen are handled a belt sander makes a fine tool grinder and will also handle most other grinding jobs in the typical home shop.
Getting a handle on the angles
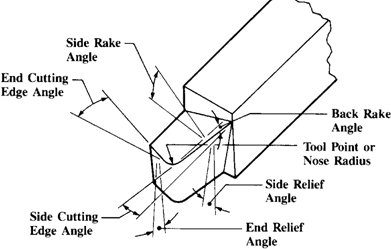
Take a look at this diagram from Machinery’s Handbook (MHB):
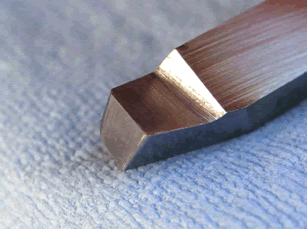
Lathe tools cut at a single point of contact so they are commonly called single point tools. This point is the interface between three surfaces: the side, the end and the top. Each of these surfaces is usually angled in two planes.
- The words relief angle in the diagram above refers only to the vertical angle of the side and end faces of the tool tip. The words rake angle refers only to the horizontal angles of the top surface of the tool. The words edge angle have to do with how the tool is shaped; due to the wide range of shapes a tool can take these edge angles are not found in the typical angle table.
- Relief angles are primarily clearance angles that allow the tool to cut at the tip and upper edges of the tool without the area immediately below rubbing against the work when the tip is set to center height. They are critical angles in that they form one half of the main cutting edge, the other half being the top rake angles. Relief angles affect finish, tool life, cutting forces and cutting temperatures. For a small lathe we want to use the largest relief angles we can get away with without weakening the tool. This is especially true with finishing tools where larger relief angles prevent rubbing and greatly improve finishes. Larger angles also enhance penetration of the tool into the work for all cuts, a good thing for a small lathe.
- Rake angles direct chips away from the working area of the tool. Note that there are two kinds of rake: side rake and back rake. Of the two, side rake is far more important for a turning tool, while back rake angles are less critical (except on parting tools where back rake assumes the importance of side rake on a turning tool). Different materials require different amounts of side rake for efficient chip clearance. In general, cutting forces will run perpendicular to the side cutting edge and as the tool cuts the chips will follow the path of least resistance. Rake, particularly side rake, provides this path. Much of the heat in a cutting operation is carried off by the chip so clearing those chips efficiently will reduce cutting temperatures. Being the other critical half of the cutting edge side rake, and to a lesser degree back rake, has much to do with reducing cutting forces. Cutting forces and cutting temperatures decrease, and tool life increases as side rake and back rake become more positive up to an optimal point (MHB). Therefore, for a given set of rake values in a cutting tool table you want to go for the higher value for use on a small lathe to improve chip clearance and reduce cutting forces.
- Edge angles define the tool’s shape as seen from the top of the tool. They vary with the purpose of the tool and also by how much strength is needed at the tip. Tools meant for heavy cuts, like a rougher, will have more mass at the tip to handle higher cutting loads, while a finishing tool will have a more delicate tip appropriate to the lighter cuts it is meant to take. These angles are less critical than the other parameters and are really dictated by your needs for tip strength, finishing potential and access to corners.
- The nose radius at the tip of the tool varies with the general purpose of the tool. Roughing tools will typically have a smaller nose radius, while finishing tools generally have a larger nose radius. Note that a large nose radius greatly increases cutting forces because it is constantly being pushed out of the cut. For tools up to 3/8″ square it is best to limit the nose radius to a maximum of 1/64″. You can go up to a 1/32″ radius on a finishing tool but lighter cuts are necessary. When forming or grinding it you do not need to measure the nose radius with a gage – just estimate it.
Honing a tool after it is ground is a controversial thing. Many experienced machinists say they don’t bother. However, any edge defects that occur during the grinding process will transfer to the work; we may not care too much about it for a rougher but for a finishing tool this is not a good thing. Since honing also extends tool life and reduces the need to re-grind a tool I can’t see a reason not to hone a tool.
Honing is best done with a fine or extra-fine diamond stone. I prefer the solid surface stones on a steel base, not the plastic base with dots. If I need to do a lot of stoning I use a 2″ X 6″ stone . If I am honing after grinding a tool on the belt sander then I use the credit card size; they are cheaper and easier to handle. I use the fine stone to get off most grind marks and the extra-fine to obtain a nice homogeneous surface. Maintaining your tools after this will take only a few strokes per face.
Hold the stone in one hand and the tool in the other. Focus your pressure over the center of the face and stroke in one direction lightly, preferably under a running stream of water. Keep your wrists locked to avoid changing angles and creating facets. I suggest honing the side and end first, leaving the top of the tool for last; this removes any burrs and leaves a very clean edge. Your goal is to remove all evidence of grinding marks. Be sure to catch the nose radius when honing. If you need the finest finish possible for your work hone the tool, then polish it on a translucent Arkansas stone and your tool will cut like a razor.
Now that we have a better idea of what all those confusing angles are and what they do, we need to see how they are used to make a lathe tool. Part 2 will look at the Angle Table, how we can modify the angles to reduce cutting forces, and we’ll discuss the different shapes lathe tools can take.
In Part 2, we’ll put it all together and grind a tool on a belt sander.
Hello
What type of tool post are you using?
Hey Bill,
The tool post is the wedge-style tool post from TS Engineering. Its far more stable than the piston-style post commonly sold for small lathes. Too bad TS Engineering left the market; they made good stuff.
Mikey
Thanks Mikey, your guide has given me an insight into what mistakes I’ve possibly been making. I’ve been using a vintage grayson lathe to make a bell mouth out of 60mm mild steel bar. I’ve only managed to remove 5mm metal in 3 hours I now believe the cutting tools are wrong.
Chris, you’re welcome – hope it helps.
Mikey
The first few weeks in the shop in the ‘lathe section’ when I went to trade school were spent on grinding HSS tool blanks on pedestal grinders. Sure most people there were in their early twenties but it didn’t take more than that time for people to be able to do the hand motion to make a flat surface without facets with the round wheel.
With a pail of cold water in front of the grinder you can rapidly rough out the cutter and finish grind it with the fine grit wheel while quenching to preserve the temper. It’s really not a big deal to use the grinder this way.
In the job shop where I work some people sharpen tools with the belt sander but the round wheel type, not the flat type to shortcut and avoid facets.
For a home shop the only reason I can see to use a belt sander over a grinder would be that replacing the belts is easier and you are right about explosions, particularly near the end of life span when you get cheap about using bald belts/tiny wheels. If you can afford it I would grind my tools with a grinder then touch up with a belt or hone when they get dull.
All the rest of your information about geometry is very good and what I remember from school. After a while it becomes very intuitive and you basically know what a tool should look like for a given depth of cut/material ect.
Thanks for your comments, Jorge. A bench grinder works – no doubt about it. As I said, for an experienced machinist a bench grinder is fine, especially if he was trained with it and does it often enough to maintain his skill. I can freehand a good tool on a bench grinder, too, but I much prefer the cool cutting flat platen belt sander. Either way, as long as we can get the tool we need then that’s what counts. My intention is to help the new guy get started and it remains to be seen if that is the result. I threw a lot of info out there and I’m worried it was too much. We’ll see.
Mikey
FWIW, I’ve been playing at my lathe for ~ 5 years now and have read many, many explanations. Yours is the best! Especially this one simple sentence: This point is the interface between three surfaces: the side, the end and the top. Each of these surfaces is usually angled in two planes.
I’ve shared it with bold italics on “three surfaces,” “Side,” “the end,”, and “top.”
Ron
I’m not sure what you consider a lathe tool grinder, Jacky. Are you referring to a tool and cutter grinder or a bench grinder? I have a lot of experience with a bench grinder and none with a tool and cutter grinder (mostly because they are very expensive).
For shaping lathe tools the belt sander serves the home shop guy well but if your company makes a tool grinder that is affordable I think we would welcome a video showing how it works. I would, anyway.
Welcome to MachinistsBlog, by the way.
Mikey
Really need to give this a try.
I would be interested to hear how it works out, Max.
Mikey
Well I gave it a go over the weekend. My disk /belt sander only have a 25mm (1″)belt on it. Used for sanding balsa and ply wood only. It worked great. Much better control on the sander than the bench grinder. I did have to alternate between the disk and belt to get the shape I needed, due to the belt support a few mm wider than the belt. Now I’m thinking of modifying my old little bench grinder into a twin 50mm belt sander. One fine and one coarse belt. That will give me a good excuse to upgrade to a better bench grinder too.
What happened to part 2 of this very interesting post
Hi Wally,
Check the How To section under Categories in the left menu bar.
Mikey
Many thanks Mike,this is excellent.Congratulations!
I only found this site a week ago and I now see how to navigate around. As a knife maker I have good belt grinders with belt width of both 30 and 50 mm. I am going to make this into a project and hopefully I’ll get to somewhere close to your proficiency.
Wally
Thanks for the compliment, Wally. I do hope it helps you. Grinding tools gets easier with a good grinder and it sounds like you have that already – you’ll be very good at it in no time.
Let me know if you have any questions.
Mikey
can you dip the tool in water as you grind the tool to its shape
Yes, you can dip the tool.
where is part 2?
Here you go:
https://www.machinistblog.com/category/how-to/
i came across this 1/2hp hybrid 2×24 eastwood belt sanders for under $100, it looks promising.
http://www.eastwood.com/1-2hp-8-combination-bench-grinder-and-belt-sander.html?fee=5&fep=26298&utm_content=13577&utm_campaign=Shopzilla01&utm_source=Shopzilla&utm_medium=Merchant-Centre&SRCCODE=1SE1532#
It looks like Eastwood only stocks an 80 grit belt in this unusual 2×28″ size. 80 grit is a bit fine for tool grinding but it would work for general shop use. If you go for it, let us know how it works out for you.
you are right nothing under 80 , i did find this belt maker econoway.com which make custom belt with interesting choices like silicon carbide, zirconia alumina and ceramic belt?, interestingly a 2 inch x 28, 24 Grit ceramic will cost 9$ but if you buy it in 8 inch wide it will be only $20, im thinking that it should not be too hard to cut it in 4 pieces…
have you try zirconia or ceramic?
I have only used AO on my tool grinding belt sander but use Zirconia on my 4 X 24 sander all the time. AO is cheap, readily available and works really well on my machine. I have not used ceramic belts so cannot attest to how well they work – sorry.
If I were to buy a belt sander today I would look for something that uses belts of common size. A 2 X 72 or even a 2 X 48 would be about right. The ready availability and cost of the belts is a big consideration, mainly because we cannot stockpile them for when we need them. The splice has a definite shelf life so they have to be fairly fresh.
For myself, and please don’t infer any criticism of your choice here, I would not buy this sander because of the odd belt size. It might work for your needs, however, so go with what you think best, Fred.
Hi,Mikey have just got a disc grinder,1hp motor 12ins disc,used a AO 40grit sanding disc done job well,but the sander came with 5 new disc 80grit,one was already on m/c so l had to take it off to put the 40grit on,they are self adhesive and it came off in pieces thought shame waste of a good sanding disc,now if l wanted to put the 80grit back on that would mean a perfectly good 40grit would be ruined,so there,s an easy fix which l,m going to do, the aluminium backing plate that the sanding disc sticks to is held on by a countered bored capnut,l will take the backing disc out and increase that c/bore to 4ins diax 1/8ins depth-turn a bit of aluminium 4ins diax1ins that will fit into my c/bore on the backplate it will be c/bored to suit the cap head which will need a longer bolt-then l can cut a 4ins hole in center of my roughing disc and this will stick to backing plate leaving the center 4ins to take a finer grit for finishing, now l can rough and finish a tool without changing discs-you will need to mill clearance say 4ins+and 1ins+in center of your table-Brian
Sounds like a great solution, Brian. Those 12″ disc sanders are usually very powerful and will take a lot of steel off in a hurry. I’ve used one on wood but never for grinding tools – please keep us posted on how you do with it!
Mikey
Hi Mikey : I have a 9″ South Bend lathe and using the original tool holders (right and left hand offset and straight. In these holders the tool is angled up at a 7 degrees. It seems to me that this going to affect the angle that is set on the belt grinder tool rest. If this is so, how does one compensate and how many sides does this affect?
thanks so much for your presentation
Hi Ken,
You’re right. Using the lantern tool post does create a problem because of the built-in 7 degree angle the tool is presented at. This negates 7 degrees of relief so it would seem to me that you would need to add that 7 degrees to whatever angle you are grinding. For example, if you wanted 15 degrees of side or end relief you would have to set the grinder table to 22 degrees. For the rake angles, I would grind them normally and see how it goes.
My main concern would be getting the right relief angles ground so you get the clearance you need. You will need to take shallower cuts as the edge is not well supported but it should work.
Let us know how it goes. Maybe its time for an Aloris-style tool post?
Mikey
I am also a new guy as you. And i wondered whether how the operation speed of the belt sander. After reading your article, it helps me understand several problems. Thanks!
The Craftsman belt sander has a 3450 rpm motor, which is just about right for a 42″ belt.
Give the belt sander a try. I think it will be easier to learn to grind tools on.
Parts 2 and 3 can be found where?
Part 2 and 3 can be found here:
https://www.machinistblog.com/category/how-to/
Just came in trying to use my belt grinder to grind HSS, also first time grinding. I didn’t think it went very well at all, belt wears quickly on the edges for instance when I want to make a relief cut. I was thinking now here’s a time when my homemade belt grinder failed me, usually I’ve made do without a regular grinder thanks to it. But for this application I didn’t have much success. I have a slow motor on it, mostly used it to sharpen chisels and other tools.
Dennis, have you tried ceramic belts on your sander? I have and I found them to be far better than Aluminum Oxide belts.
It also sounds like your platen might be part of your problem. A platen should have square edges; not sharp, but square. I prefer a glass platen liner and find that my belts do not wear excessively on the edges.
I was using a 120 grit ceramic belt meant for a sorby grinder, it’s what I patterned the grinder off, the platen is a piece of L-profile angle iron, the edge is pretty square on one side but not sharp, and rounded on the other. I meant the wear was on on the front of the belt, it stopped removing material, I spent 45 minutes last night working on a single piece and didn’t really get anywhere.
I think I might not have enough speed to boot, 1400rpm 3-phase motor (4-pole @50hz), I have some homemade step pulleys so I can change the speed up a bit but nowhere near say the 3450rpm those cheap 1″ grinders you get in america does. I have some 4″ 40 and 60 grit zirconium belts, I need to split them though, my grinder takes 2″.
It’s very good for what I use it for, sharpening HSS woodturning chisels, bench chisels, wood plane blades, twist drill bits, knives. None of these require such massive material removal on such a small portion of the belt though.
I’ve been using Red Label belts from Amazon lately and find them to be amazing. I use 36 grit to shape and 80 grit to finish shaping, then hone with diamond stones. Works good for me. I recently ground 9 model tools from keystock, one from M2 HSS and two tools from 5% cobalt HSS on the same belts and there is little noticeable wear.
Excited to learn about lathe tool grinding.
Can you please recommend a source or plans for the fixture that you use.
It appears to provide accurate and repeatable angle settings.
Thanks in advance.
Hey, Dan,
I don’t use a fixture but I do use a belt sander with a good tool rest. You can see it here on this site: https://www.machinistblog.com/modifying-a-craftsman-2-x-42-inch-belt-sander-for-tool-grinding/