Here’s another excellent article by Mikey. It will show you how to take a worn or abused Albrecht keyless chuck and rebuild it to be like new. – Rob
I was really stuck. No, this wasn’t the ordinary kind of stuck. This was one of those seriously awful expletive deleted kinds! Having just bought my first “genuine Albrecht chuck” on eBay, I was stoked. I recall thinking, “I’ll just overhaul that puppy and have me a precision keyless chuck for cheap!” Talk about naïve – that first chuck brought me to my knees!
It resisted all my efforts to get it apart, had an arbor stuck in there that didn’t fit any of my machines, and I was beginning to have that sick “paperweight” feeling. Yes, I did the penetrating oil and the hammer taps every time I passed it for three days, repaired my strap wrench twice, spoke a lot of “nice” words to it, lost sleep over it and almost picked up my torch! Pathetic but all true. Sound familiar?
I looked for help on the net and, to my dismay, found very little! I won’t recap the misery that ensued but I did eventually get that chuck rebuilt and promised myself that if I ever learned to work on these things effectively that I would share it with my fellow hobbyists because nobody should have to go through that! This is my attempt to fulfill that promise.
I have since rebuilt seven of these eBay specials and have learned a thing or two that work for me and I hope they work for you. If you’re stuck like I was then read on and we’ll learn how to get the thing apart, get the arbor out, and get it back together again as painlessly as possible.
As always, work safely and proceed at your own risk.
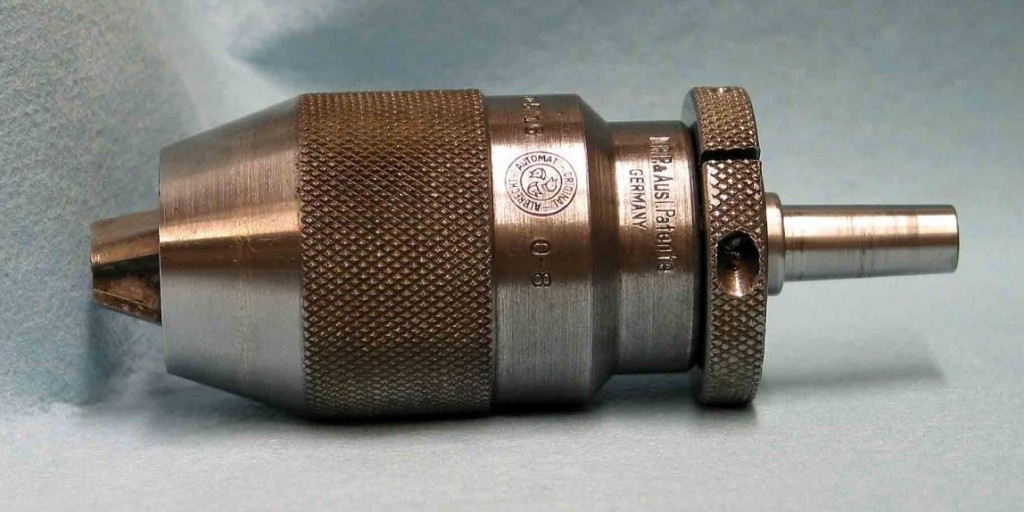
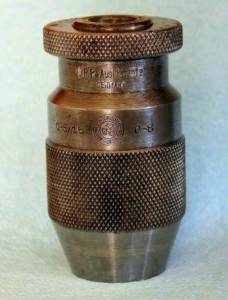
We will use the C80-J2, a 5/16″ capacity chuck that I bought on eBay,
for our rebuild. Its jaws were galled from a spinning drill bit in an
over-tightened chuck and were replaced during this rebuild. The rest of
the chuck showed little discernible wear.
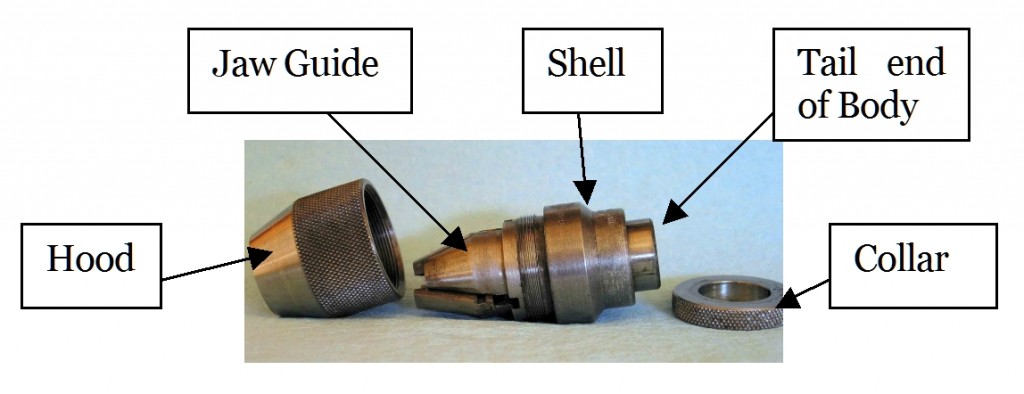
Albrecht Anatomy 101
The 5/16″, 3/8″ and ½” chucks in Albrecht’s Classic Series have the same anatomy, differing only in size. Once you know how to work on one of them you will know how to work on all of these. I have not worked on the other chucks in the series but suspect they are the same.
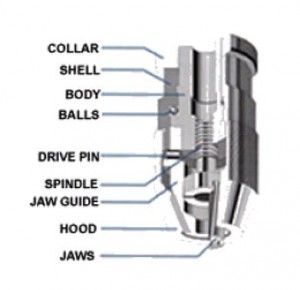
Typically, there are three obstacles you will face when disassembling an Albrecht chuck: getting the collar locking screw out, getting the hood off and getting the arbor out. The rest is easy. I would encourage you to read this to the end before beginning work on your chuck as there are some CAUTIONS to be aware of. When working on precision assemblies with parts that are expensive to replace please work carefully and take your time.
Disassembly
Before breaking down your chuck consider putting it in your drill press or lathe and use a steel brush to clean the knurled parts and gently polish up the smooth areas. I suggest wiping it down with alcohol or lacquer thinner first to avoid burnishing in the surface contamination. This is best done before you break it down so grit doesn’t get into your nice clean chuck.
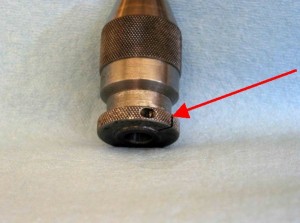
- Remove the slotted collar locking screw. Caution: Be sure to use a screwdriver that fully engages the slot to avoid damaging the head. Quite often these screws are in there really tight. A 5/16″ chuck takes a metric size 4.5 screwdriver blade, while 3/8″ and ½” chucks both take a size 5.5. I suggest you clamp the chuck in a padded vise so you can apply controlled pressure directly in line with the screw. Once the screw is out wedge the tip of an old screwdriver into the slot in the collar to open it and the collar will simply slip off the tail of the body.
- Now we need to get the hood off. Albrecht recommends clamping the shell in a fixture and removing the hood with a strap wrench. Okay, maybe with their strap wrench! My Klein strap wrench has only been able to budge the hood on one chuck but by all means try it. If it fails …Here is an option that does not damage the hood and gets the tightest hood off in a few seconds. Trust me – you want to make these.
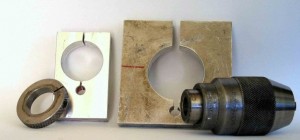 These two 3/8″ thick aluminum plates have holes bored to the diameter of the body and hood. Once the slots are cut the hole opens just enough to fit nicely. The small secondary hole is to prevent the plate from cracking under compression. By the way, the factory uses this type of plate (1/4″ thick) to hold the shell when removing hoods. Once made, label them so another chuck of the same size can be worked on. You will need separate plates for different sizes of chucks, of course, but they are simple to make with a hole saw followed by a boring head.
- The smaller plate slips onto the body just below the angled step, while the larger one clamps onto the upper part of the knurled area of the hood. The threaded part of the hood is at the lower part of this knurled area and no pressure is applied to it if you position the plate as shown.
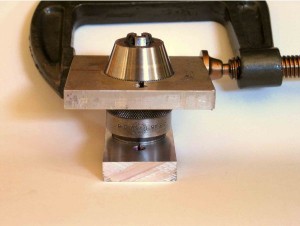 A large C-clamp is applied to the slotted side of the larger plate and the lower plate is clamped in a vise. Tighten the C-clamp so it does not slip. If the shell spins, tighten the vise (degreasing the plate and shell really helps here). Use the screw of the C-clamp for leverage and even the tightest hood will come right off (RH thread).
Once you have loosened the hood but before you take it off, move to your workbench and work over a shop towel or tray.
- Remove the hood and move the spindle up (turn the part of the body where the collar used to sit) about half way and slip the jaws out. Now screw the spindle up further and it will push the jaw guide up so you can lift it off the shell.
- Remove the spindle and body by pulling them straight out. Remove the 25 ball bearings. Caution: don’t drop them on the shop floor as you will need ALL of them.
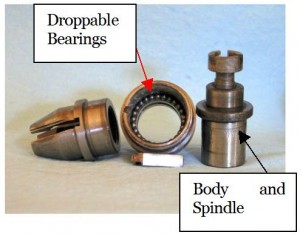 You should now be able to see the end of the arbor through the rear of the body, which can sometimes be driven out with a punch. Caution: There is great potential for damaging the internal threads of the body here. I would suggest slipping a small piece of thin-walled tubing in there before using a punch. Also be very sure to fully support the end of the body where the arbor exits before you let the BFH fall.
- It isn’t unusual to find that the arbor is in there so tight that a punch fails to budge it. Here is an option that has worked every time I needed it.
- Cut the arbor, leaving about ¼” of arbor sticking out. Put the spindle body in your lathe and drill and tap for a bolt of your choice (I use a 5/16-24) at least ½” deep. You want this bolt in the center of the arbor stub so tension is applied along the axis of the arbor.
- Transfer the body to a padded vise and find a socket/pipe/hollow thing that fits. Using a heavy washer under the bolt head, tighten the bolt into the tail of the arbor stub through the socket. The outer edge of the socket bears on the spindle body. Most of the time this will pop the arbor out but if it doesn’t, use your punch from the inside and give it a few taps and the arbor should come out.
- If your arbor is through-hardened (most “hardened” arbors I have seen are case hardened) and you cannot drill and tap it then your best option is to use a hydraulic press. Support the end of the body, not the ring halfway up, when doing this.
Your chuck is now completely disassembled and you can clean your parts with degreaser, then hot soapy water and blow them out. After cleaning the spindle and body threads wipe them with lacquer thinner before setting them aside. Now you can begin inspecting the parts to see if any are damaged enough to warrant replacement.
Smooth out any burrs with a diamond file. By the way, Eze-Lap sells a little diamond-coated hook sharpener with a shank about 3/16″ OD and a coned tip that works well on burrs inside a chuck’s taper socket.
Now that the chuck is apart you can see how it works. As the hood is tightened the spindle moves up. The jaws, which are linked to the spindle, move up in the jaw guide. Constrained by the inside of the hood the jaws close on the bit while the spindle pushes up on the bit from below. The result is that the bit, once locked, effectively becomes a solid part of the chuck, thereby transferring the accuracy of the chuck to the bit. As cutting forces are encountered the chuck actually tightens; the greater the force the tighter the chuck becomes. Neat design, huh?
The above scenario is only true as long as the spindle and body are clean and dry. If oil gets into the spindle assembly it cannot resist the cutting forces and the drill will slip – this is the Achille’s Heel of keyless chucks of this design and the fault of the user. Attempts to over-tighten the chuck will not work for long and the drill can slip badly enough to gall even the hardened jaws of an Albrecht chuck. This is why so many chucks sold on eBay have severely tightened hoods, really tight collar-locking screws, vise marks on the collars and worn jaws – oil in the spindle! The point I want to make is that if a drill ever spins in your Albrecht chuck, please take the time to disassemble it and clean the spindle assembly.
As for the stuck arbors, well, don’t get me started …
Assembly
Guy Lautard wrote a treatise on this subject in one of his excellent Bedside Readers. There were several (paraphrased) notes there that are important:
- Inspect the inside of the hood. The jaws ride on this surface and there needs to be some “tooth” to it so take some 320 grit sandpaper and scuff the inside of the hood where the jaws ride – they will look shiny and you’re trying to remove the shine.
- The spindle and body must be clean and dry. 🙂
Except for the area holding the bearings a very light application of lubricant is all that is necessary. Assembly is essentially just the reverse of the above.
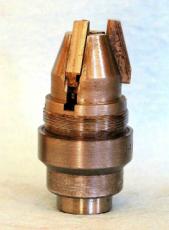 Apply grease to the bearing seat. I also use a light coat of grease to the area leading out the back of the shell, toward the arbor taper, to prevent any grit from working into the bearing area.
- Insert all 25 ball bearings. I use an acid brush to apply grease during assembly and stabbing down onto a bearing traps it at the tip of the brush, allowing you to transfer it to the bearing seat area. A broad-tipped tweezers is faster but avoid squeezing too hard or you’ll launch the bearing. Remember the shop towel!
- Once all the bearings are in place you can apply light grease to the underside of the body where it contacts the bearings (don’t get grease on the front side) and slide it into place.
- Apply some oil to a Q-tip and lightly oil the jaw guide slots where the jaws will ride. I also lightly oil the inside of the hood at the jaw contact points.
- Insert the clean dry spindle (LH thread) into the clean dry body. Caution: Okay, I’ll spare you further comments about oil but you get the point.
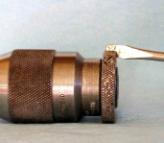 Slide on the jaw guide, being sure to line up the drive pin. If your drive pin is somehow damaged you can replace it with a standard roll pin cut to size. Now spin the spindle up about halfway and insert the jaws. (Contrary to what I have read on the net, the jaws are not matched to their carrier so numbering or otherwise marking their original position is not necessary. If they were matched what would you do with replacement jaws?)
- Lightly oil the threads on the shell and screw the hood in place. Put the chuck back in your fixture and tighten the hood with a strap wrench. Do not apply excessive pressure here – just snug it. It gets tighter in use.
- Wedge a screwdriver into the slot of the collar to open it up. Slide the collar up against the bottom of the shell, leaving just a tiny bit of clearance so the hood moves freely. Lightly oil the collar locking screw and just snug it down – you do not need excessive pressure on this screw.
Conclusion
Congratulations, you’re done! Your chuck should now feel smooth and precise and is ready to go to work in your shop. No ongoing maintenance is usually required in the hobby machine shop setting. An occasional light coat of oil externally will keep any rust at bay – try Camelia Oil for this … you’ll love it.
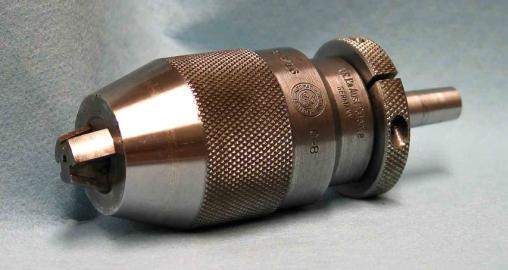 Our rebuilt chuck drilled a 1/16″ (0.0625″)
hole in the end of a 0-1 steel rod held in an
ER32 collet on my lathe; it went straight in
with no wandering at the tip.
Mikey, 2008
Give me my fixtures and a good C-clamp and I will fear no Albrecht! Glad you got it sorted, Dave, and I am totally not surprised that a hydraulic press was needed to remove that arbor. I wonder how many hammer blows were needed to put it in there like that?
Thanks for the article Mikey. I did as you said but ran into a problem. I can fairly easily turn the shell while the body remains unmoved. But, nothing else happens. It turns in either direction but makes no apparent attempt to unscrew (CC) or tighten (CW). Just sits there and spins(?). Any suggestions?
Steve
Steve, do I understand you correctly that if you tighten or loosen the chuck the jaws don’t move? If so, then it is likely the little drive pin is damaged and not engaging. You need to disassemble the chuck and replace the pin. Find a roll pin that will fit the hole and cut it to size and it will work fine.
Let me know if this helps or not.
Mikey
..
NIGEL ALLEN
February 4, 2015 at 3:11 AM | Reply
NIGEL ALLEN
February 4, 2015 at 3:03 AM | Reply
Dear Mikey, My query relates to your article on rebuilding a Albrecht drill chuck. Following your advice I have stripped my Metabo similar chuck. I find that the spindle and body are seized together and in spite of my efforts to undo the left hand thread they will not come apart. I have held the jaw end of the spindle in a Schaublin collet in my lathe tightened very securely but as both parts are hardened they just slip. I have used moderate heat and penetrating oil without succ0ess. I am tempted to assemble the spindle with the chuck jaws in place in the jaw guide and hold the guide on its outsider diameter on a fixture I, will make and use the three jaw engagement to give me a fully supported method to hold the spindle but feel this is a last resort effort. Can you confirm that these two parts must be threaded with a left hand thread as otherwise I cannot see how the chuck operates and do you have any suggestions that might help? I have asked Metabo for a diagram of the chuck and suggestions but have had no response so far! Excuse me using this article web site but I cannot recall your original article on the Machinist site. Kindest Regards, NIGEL ALLEN 3.2.2015
Hi Nigel. I have never worked on a Metabo chuck before and cannot be certain if it is a left or right hand thread holding the spindle to the body. On the Albrecht, it is left hand threaded.
If it were me, I would buy a split collar to fit the diameter of the spindle and lock that in place. I would then put the body into a good solid 4-jaw chuck or collet and lock it down tight. Then I would use a strap wrench or some other device to clamp onto the split collar and tap the wrench handle with a hammer. I would try turning the collar Clockwise first and if that failed then I would try CCW.
I would do the above in preference to heating with a torch to avoid affecting the tempering of the parts.
I’m sorry I cannot be more help than that. Please let us know how it turns out, Nigel, and good luck.
Mikey
Dear Mikey,
Re Metabo chuck. Thanks to your advice I stripped the chuck but could not free off the internal thread in spite of every possible effort. I, looked at the Metabo web site to find they had a service centre in my next town down here on the South coast of UK. I sent them the chuck and after many weeks, since they no longer sell this model and its service lies in the mists of the past, I, have it back serviced at no charge! A very nice service in this day and age!
Thank you for your help. Regards Nigel Allen.
Great news, Nigel. Such service is getting rarer these days, so much so that we are surprised when it happens. It says a lot about Metabo and I’ll remember it – thanks!
Mikey
Im looking for a vendor to rebuild our albrecht chucks 0-1/8″ we use them just for holding a core wire and the tips of the core wire which are thinner than a hair tend to break off and does not allow for teeth to close down to 0.
Jorge, why not do it yourself? They are simple to do. You can optionally send them to Albrecht, who will service them for you at a cost.
I’m having back surgery in two days and will not be able to do it for you. Perhaps one of our blog members might be interested?
Hi Guys,
A note on any Albrecht rebuild, the roll pin is of a special type, it is wound like a thin spring. They protect the chuck and your machine in case of a
cutter being crashed into job at warp speed. The pin will shear and save everything, well maybe not the part you were cutting.The hood will come of a bit harder after the pin gives it up. The Germans did a good job with the pin design. I had a bad day and the factory pin saved me. The pin is a dollar, The best buck i ever spent. With a full on roll pin it could have been
the spindle ect.
Mikey, thanks for this guide! I’ve made a set of clamps and used them at work several times. I did want to ask about this question though. I am in the same situation with the hood spinning and no removal. I did feel the pin snap while turning the clamp and hood. Is there a step to getting past this? since the hood is now floating I cannot disassemble farther to get to the pin.
Thanks,
Ephraim
Hi Ephraim. Sorry to hear you’re having issues. The hood is threaded onto the shell so you must grab the lower part of the shell in your fixture. Once you do that the hood will come off. It sounds like you’re grabbing onto the body – the part that sticks out of the shell – and that is why things are spinning. Grab the shell and that hood will come off.
Have you ever repaired a 0 to 1/8 Albrecht Chuck? I have one that just spins and doesn’t tighten or loosen. The jaws never move.
I have not done a 1/8″ chuck. I believe they are similar though, and if so then the problem is the drive pin is busted on yours. Rather than risk disassembling such a tiny and expensive chuck I would contact Albrecht. I know a guy who had the same problem on a used chuck and they had him send it in. Not long after that, they sent him a brand new chuck for free. Worth a shot, I think.
I am trying to disassemble a metabo keyless chuck.
Your clamps look like what is needed.
Is the hood thread left or right handed ?
Cheers
The hood is right hand thread on an Albrecht.
Thanks indeed for this! Just spent a happy morning stripping and cleaning our Albrecht chuck which had been driving us nuts last year, and now it works perfectly! Very much appreciate your time taken to put this explanation together!
You are most welcome, Tim. Glad it worked out.
Hi Mikey,
Have you ever heard of a Morrow chuck? they seem to be built almost the same as the Albrecht, I have 2 of them and have the hood off from one the other will need a lot of rust removal! I am trying to see how the rest of it dis-assembles, I have the jaws removed, they just slide out, But I can’t find another place where the body of this thing might separate. The inner screw part that moves the jaws seems to need a good cleaning because it only rotates about 3 turns then sticks. It looks like the rear of the chuck might take some kind of pin spanner to engage a pair of holes in the back part of the chuck.These things are so precisely machined that it is really hard to see where it would come apart. Any ideas? Thanks, Kirk
Never heard of or seen the Morrow chuck, Kirk, sorry. I did look at the original patent drawings and there seems to be enough detail for you to sort out how the chuck comes apart. Have a look and let us know how it goes.
Mikey
Well, I made a fixture to hold the Morrow chuck ring to unscrew it. I have to wonder if the Albrecht was a copy of the Morrow, they are very similar!I have it almost completely disassembled except for the jaw pushing screw. It will only turn a few turns. I am soaking it with WD40. I think it’s loaded with over 100 years of grunge that has solidified. It seems to be turning a little farther as I work it. In this case time is my friend!
Glad to hear you got it apart. That is the hard part. Going back together will be much easier and I hope its accurate. Thanks for sharing, Kirk!
Mikey I have just taken apart my 1/2 Albrecht chuck as I wasn’t able to tighten it, sometimes I would think it tight but turning machine on and chuck will loosen and drop out drill..Worked fine until it didn’t! I read to be careful not to lose the ball bearings..I cautioned for not; there are no ball bearings! Do I have a cheap model chuck? Other than some old grease an minor swarf it looks ok inside..Any thoughts on adjustment when re assembling?
Mikey, up date..Found the bearings, didn’t have it all apart! Duh on my part..If I clean and lube and re assemble and it still doesn’t tighten what should I look for? Nothing really bad inside..
If you follow the process laid out in the discussion here, it will work fine, Seb. The chuck is pretty simple and there isn’t much to it. Just pay attention to cleanliness and oil sparingly and you should be good.
If you do run into problems, send me a private email address and I’ll contact you. I don’t think this site allows you to post pics and that is what we’ll need to go further.
I re read instructions for assembly and discovered I lubed left-hand threads so took back a part and cleaned male and female threads spotless and reassemled..Is better, not sure if it is as good as it should be..Does the drill put in the chuck have to be bottomed out? I will test on machine later and post how it goes..
If there is ANY oil or grease on the spindle threads then the drill can slip. If it slips, take it apart and use lacquer thinner or acetone to clean the spindle, then reassemble.
The drill bit is meant to be bottomed out in these chucks.
Seems to work ok..Thanks for input and instructions!!
You’re welcome. Glad it worked out.
I have some of these chucks with drills still in the jaws and will not come loose.
Is the procedure the same with tooling still in the chuck?
Haven’t run into that problem. I would make a holding plate like I showed in the article, take the collar off and clamp the back of the chuck in the fixture and then use a strap wrench to get the hood off.
Hi
Great article. It inspired me to fix my C130 chuck. I got it apart and got all the crap and grease out. I put it back together and it still has about +/– 7 thou of runout. (the original problem) When I close the chuck all the way, the jaws still wiggle around a bit. I’m guessing that’s not right. My question is how do I figure out what part or parts are bent or whatever. Seems like it could be the jaws, hood, or jaw guide.thanks for the article. greg
Hey Greg. Tough to say exactly which part is causing the runout but when the chuck is fully closed there should not be any movement in the jaws. As the chuck is tightened, the outer surfaces of the jaws contact and are constrained by the hood. When fully tightened, the inner part of the jaws should touch. The only way I can imagine them not doing so, and therefore allowing movement, is if the jaws are worn or the hood is really worn. I haven’t seen this before but that would be my guess – worn jaws or hood. Of the two, my guess would be the jaws.
I would do a careful examination of those parts and replace whichever one looks to be at fault.
Great writeup. Just bought a used chuck on ebay and will clean and rebuild it. What do you use for the bearing grease?
Thanks, Jeremy.
I use Super-Lube grease – works great.
Thanks for the artice. I’m surprised you don’t mention using the appropriate Jacobs wedges to remove the arbor. Just removed a really stuck arbor from my drill chuck. Had to cross drill the arbor and insert a pin to give the wedges something to push against but it worked well and seems easier than cutting, drilling and tapping the arbor. Now if could just remove the shell on my C100, this thing is stuck good.
Glad the wedges worked for you, Teryk. These wedges are made of mild steel and bend under even mild pressure. I have used them successfully on arbors that I installed but have found them to be ineffective for the vast majority of stuck arbors I’ve encountered.
Thanks for posting this. My eBay Albrecht suddenly refused to hold the bit. It would just spring back open if anyone attempted to tighten it. After following these instructions, I got it apart and cleaned out a bunch of grease and oil that was all over everything. Didn’t find anything else wrong with it. The chuck works perfectly again now that it’s properly cleaned (no oil on the body and spindle now!) and lubricated.
You’re welcome, Jacob. Glad it helped!
Very helpful article. I have a 1-13mm chuck that looks identical to an Albrecht, but is stamped “LEDnJORT”. Have you ever heard of this brand?
Thanks, Rich. No, I have not heard of that brand, nor can I find any references to it. If it is identical on the outside then you might be able to get it apart the same way. Let us know what you find on this unusual brand.
Mikey
Someone mentioned that a new spring roll pin ( Drive pin) could be had for $1. I may not be looking in the right places. Does anyone have a source?
Looks like a 4mm x 13mm spiral roll pin.
I was told not long ago that Albrecht uses a pin that shears under excess load. I wasn’t aware of that and have been using standard roll pins as replacement and haven’t see any issues. I think Royal (yeah, the live center guys) might be able to get you a replacement OEM Albrecht pin – give them a call.
Zoro.com has them. Also Grainger, but they are not as cheap.
One thing to note from this is that they need a regular service..
Excellent article and in 2021 still relevant and one of the few resources around.
I have been struggling with disassembly of my Jacobs keyless chuck JKT 160-J6 made in Spain. I have now been able to remove the arbor, collar, and get the threaded hood off. Now I am stuck with what to do next. I can’t see any way to separate and remove the jaw guide from the shell nor does it appear to be two separate pieces but I understand it may just be a very tight, low tolerance, fit. I was hoping you and/or your readers had further advice. I’d be glad to send pics if you’d like to email me. Steve
Can the spindle that accepts the 3 jaws be purchased? I have one slot broken so that jaw will not retreat into the hood without pushing it in by hand.
Thanks for any info
Greg
Greg, Royal supports Albrecht chucks in the US. You can go here for contact info:
https://royalproducts.com/product-line/live-centers/
They carry spare parts for Albrecht chucks.
Thanks
My 1/8″ Albrecht jammed in the fully-open position and won’t budge in either direction — at least with hand pressure. It is very clean and has not been mistreated. This chuck is only occasionally used and has never given any problem.
Is there anything to try short of disassembling the chuck?
Bruce