I wanted to connect a power button to a Raspberry Pi 4’s GPIO pins so I could shut it off or turn it on without having to touch the USB cable. The easiest way to do this didn’t work for me and it took me a couple of hours to find out why. I want to tell you the solution because it looks like many others have had the same problem.
This article will also tell you how to connect a power button, and also a very easy way to add an external LED so you can tell if the Pi is running or not.
Push Button Power Switch
There are a number of ways to add a power switch and the following is probably the simplest method:
- Connect a push button (normally open) to GPIO 3 (“SCL”, physical pin #5) and any of the GND pins
- Add the line
dtoverlay=gpio-shutdownto/boot/config.txton your Pi and reboot it. [From terminal: sudo nano /boot/config.txt – add line at the bottom or anywhere]
Now a push of the button should turn the Raspberry Pi on, and another push should turn it off. In my case, I could turn it on, but it would not turn off. To make a long story short, it wouldn’t turn off because the I2C interface was enabled.
You can use other GPIO pins to turn the Raspberry Pi off, but you will have to use GPIO 3 if you want to turn it on with an external switch. I need this switch because the Pi is going to be sealed inside a weatherproof robotic rover, and I need the I2C interface for some of the sensors.
The solution is to use GPIO 3 to turn the Pi on, and another GPIO pin to turn it off. So, you’ll need to connect both GPIO pins to one side of your push button and the other side to a GND pin. You’ll also need to add the following line to /boot/config.txt. Of course, you’ll need to change the GPIO pin number if you want to use a different one.
dtoverlay=gpio-shutdown,gpio_pin=17,active_low=1,gpio_pull=up=gpio-shutdown
This power switch will shutdown the Pi safely so that you don’t have to worry about corrupting your SD card and file system, which can happen if you just disconnect the power abruptly.
Also, this method does not completely power off the Raspberry Pi. It will still draw some power, because there has to be a circuit that can detect when the button has been pushed and then power up the processors. There’s also an LED on the PCB that will remain on if the Pi is connected to power, and anything that is plugged into the USB ports will still be able to draw power. I’ve seen different numbers about how much power the various RPi models will continue to use when turned off this way. It appears to be about 50mA or about .25 watts for a Raspberry Pi 4.
Eventually, to prevent damage to the batteries, I will have to find or design a low-voltage cutoff circuit for my bot that will completely disconnect power to the entire bot if the battery voltage drops too low. That circuit will need to first power off the Pi using this method, to prevent corruption of the file system, and then wait a few seconds before disconnecting the batteries.
External Power Indicator
I also need an LED or some other indicator on the outside of my rover’s chassis so I can tell if the Pi is running or not. Probably the easiest way to add one is to use GPIO 14 (physical pin 8), which is the UART Transmit pin. It will always be on (high) when the Raspberry Pi is running, unless you use it for some other purpose. So all you need to do is to connect an LED (with a 330 ohm or greater resistor) to it and a ground pin. You will also need to enable the “serial port interface” or this won’t work. It’s off by default and this search will help if you need to learn how to do it.
Some devices, like GPS receivers, need to use the serial port. If you’re using one then you won’t be able to use GPIO 14 and you’ll have to use another method to turn on the LED. I haven’t tried it yet, but this article describes another way to add a power indicator that looks like it will work.
FYI, it takes about 8 seconds for the LED to turn on after I push the button to turn on my Pi4, and it takes 1 or 2 to turn off when I push the button.
Power Switch & Power Indicator
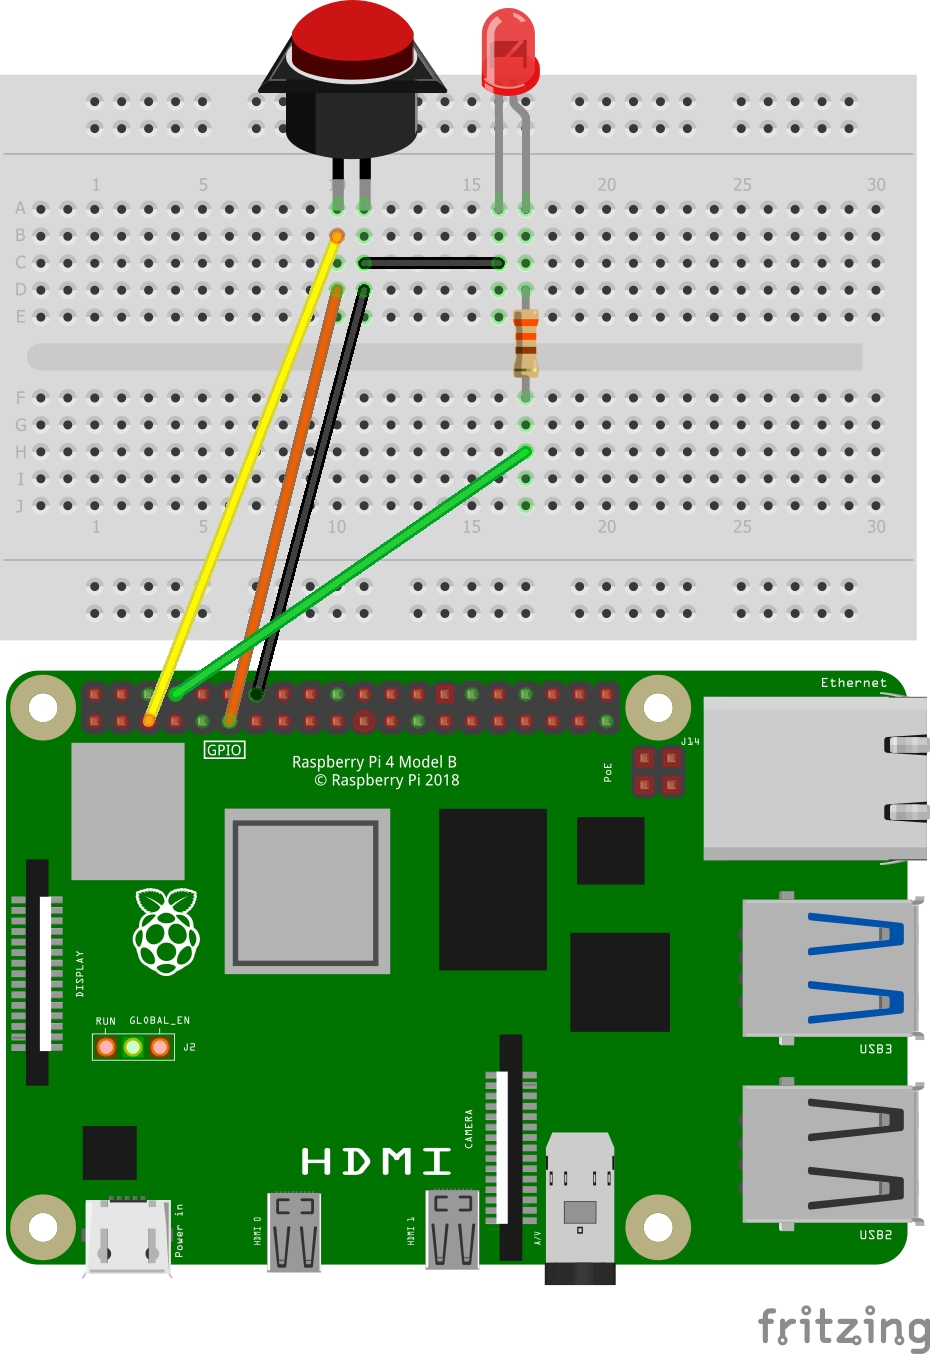
- Connect one side of a normally open push button to both GPIO 3 (required) and GPIO 17 (this one can be changed, see above)
- Connect the negative side of the LED to the other side of the push button, and then connect it to a ground pin.
- Connect a 330 ohm resistor to the positive side of the LED and then connect it to GPIO 14
nice work, I’m building a pi400 laptop, and this solves one problem for me.
thank you
Hey Rob.
Nice work, but can you help me a little more here, i have a led button with ” + NC NO C – ” how can i do i ???
Thanks
I responded on Reddit to your questions.
On my pi 4 the switch had been working for years using gpio 4, for 2 years. Now on bullseye it only powersoff but wont power on.