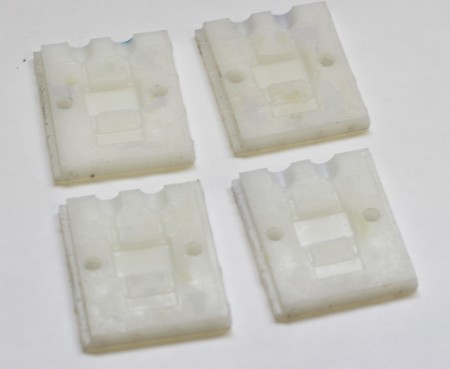
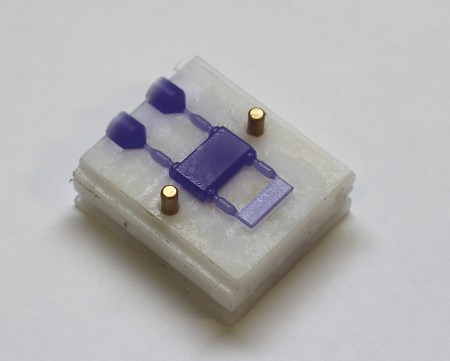
I spend about half of my time writing CAM software, and the other half doing product development for a bunch of companies. Usually my prototypes are one-off, sometimes I have to make lots of them. I happen to be in the middle of just such a project- I need to make about 50 of these:
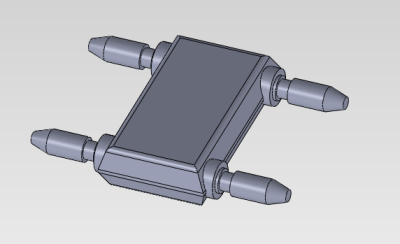
Luckily, they’re not very big, only the size of a dime. I tried using our CNC mill to machine one but it quickly became apparent that it was going to take too much time like that since it would have to be machined from two sides and with a good finish. I decided to turn to one of my favorite techniques- casting the parts.
Other people have written very extensively about casting techniques, my favorite is at http://lcamtuf.coredump.cx/guerrilla_cnc1.shtml . For the time impaired, the basic idea is that you make a mold of the part that you would like to make and fill it with a two-part resin to make the finished product. The mold can either be a soft silicone, as the site above shows, or a hard mold that you machine directly in a CNC mill. For small parts like this one I like to save a step and directly machine a hard mold. Since I only need to make 50 pieces, I decided to machine them from Delrin- a very strong plastic that happens to be relatively non-stick. The non-stick part ends up being a huge benefit here to make it easier to remove the finished parts.
Making the Molds
The fist step was to reopen my part in SolidWorks and design a mold to produce the parts. Since the part is symmetrical, I only need to make half of the mold and machine them in multiples of two.
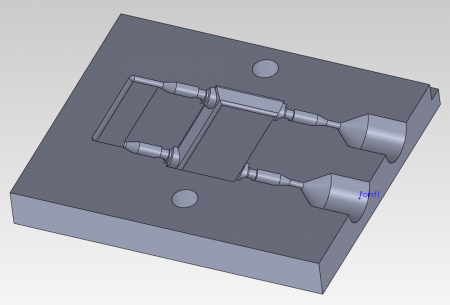
The mold shows a lot more stuff than the original part that are worth an explanation. A big part of designing a mold, whether it’s for casting like this one, or injection molding for high-volume production is making sure you provide a way for the material to flow freely into the mold. This includes providing a way for any air in the mold to be pushed out. The flow of resin will be something like this:
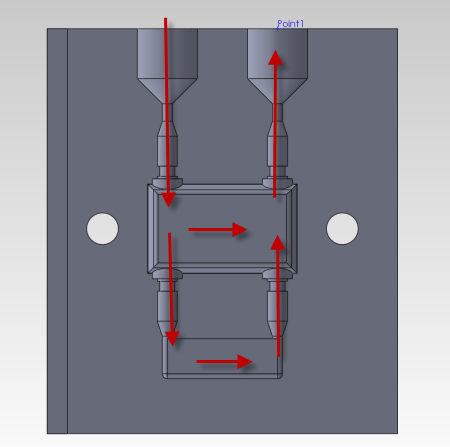
The resin is pushed in from the left and eventually overflows out through to the right, hopefully taking most of the air with it. Any air left in the mold will create a void in the finished part. Note that without the bottom-most runner, there would be no way to get resin into the bottom legs of the part since air would be trapped in there. There are certainly better ways to approach this part but this was easy and I was in a hurry to get started.
Machining the Molds
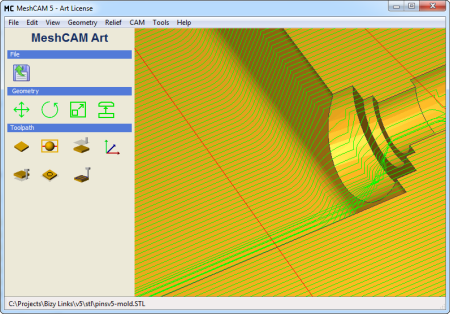
Machining these molds is easy. I exported an STL file from SolidWorks into MeshCAM to make a toolpath.
Using relatively small endmills, a .04″ endmill and a .035 ballmill, machining each half took about 3 hours from 5/16″ Delrin sheet. I could probably have pushed the feedrates a bit more but those little endmills are delicate and costly. If you’ve never worked with it before, Delrin machines beautifully without melting and building up on the tool like ABS or other plastics. It is by far my favorite plastic to machine.
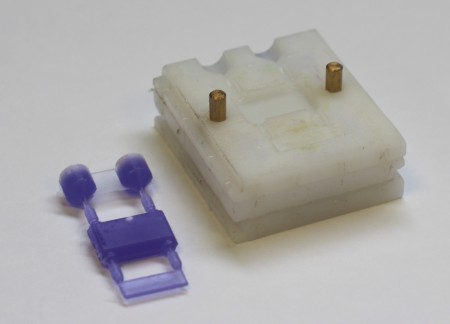
I machined a total of 4 pieces so I have 2 complete molds.
Brass dowel pins, .125″ in diameter, are inserted into the holes in either side of the mold to hold the two halves in alignment.
Casting the Parts
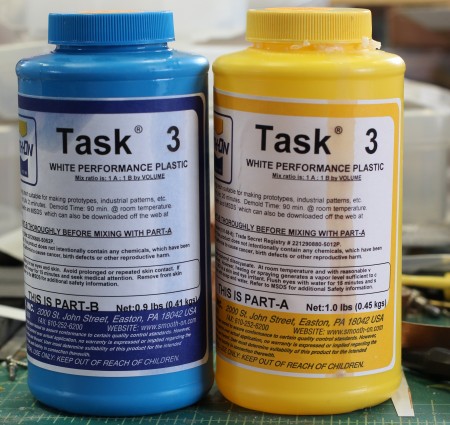
We happen to be very lucky to have a distributor of our favorite resin supplier, Smooth-On, right up the freeway from us (Reyonlds Advanced Materials). Smooth-On has several great lines of polyurethane resins available but we tend to prefer the Task line. For these parts I used Smooth-On Task 3 resin. It’s low-viscosity, so it flows well into the tiny parts I’m casting here, and it’s very strong. Task 3 is shipped in two parts, A and B. The two are mixed in equal quantities so no scale is needed. For the “Sample Kit” shown below I paid about $27. That’s enough to make hundreds of the parts I need.
I also bought a can of their recommended release agent to spray into the molds before each use. This makes removing the cured parts from mold very easy.
Mixing very small quantities of this resin is very easy using pipettes. Pipettes are small disposable eye-droppers that make it easy to grab a measured amount of each part and put it into a container for mixing. The pipettes are about $15 for 500 on Amazon and you can usually get free shipping if you have Amazon Prime. Just be sure to use a clean pipette for each part so there is no cross contamination in the resin bottles. I use a third clean pipette to inject the mixed resin into the molds.
The two molds are pinned together and held with locking pliers.
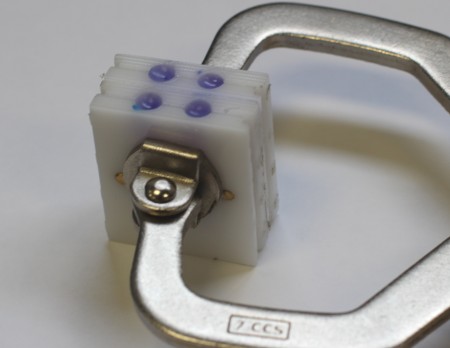
The resin is normally milky white but I chose to add a tiny amount of purple tint to give it a little color.
Because I need perfect parts, totally free of voids due to air bubbles, I put the molds into a pressure pot while the resin is curing.
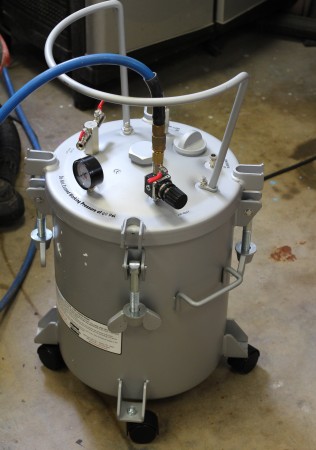
The chamber of the pot is pressurized to 60PSI using an air compressor. This causes any bubbles left in the resin to be compressed down to almost nothing. Note that the Smooth-On branded pot shown here is a fairly expensive option- almost $600- but it was the only one available immediately when I needed it. You can use any pressure pot used for painting and cap any connections that would normally be used to plumb the paint hose. Harbor Freight and Grizzly both have cheaper alternatives.
When I am casting bigger parts, where a small bubble is not a big deal, I generally don’t bother with the pressure pot. The size of these parts made it absolutely necessary.
Finished Parts
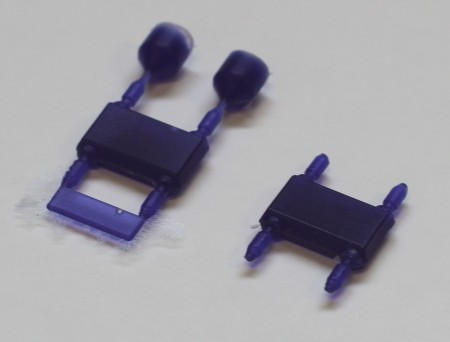
After a couple of hours in the pressure pot for curing, the molds can be opened:
The photos shows a small amount of flashing around the middle of the part. This is due to tiny gaps between the mold halves were the resin was able to flow. The flashing is easily removed in a few seconds with a file or a piece of sandpaper:
Conclusion
When you have a lot of parts to make, you might find it easier to machine a single mold to cast a large quantity of parts. The process is simple and straightforward and the equipment is, for the most part, inexpensive.
I have a friend that likes to his “research” by coming to our shop and having me write down the part numbers and suppliers for the materials I buy so he can buy known-good parts from known-good suppliers. Just in case he’s reading here:
MeshCAM CAM Software – GRZ Software
Delrin Sheets for the molds – McMaster Carr
Pipettes – Search for “Pipettes” on Amazon
Smooth-On Task 3 Resin – Reynolds Advanced Materials
Smooth-on 200 Release Agent –Reynolds Advanced Materials
Smooth-On Pressure Pot (I Like it but I would look for cheaper alternatives) – Reynolds Advanced Materials
Interesting process and nice write-up. It’s like injection molding without an using an expensive injection molding machine. I’m surprised the material did flow through the mold as planned.
I would like to discuss using your services to produce some CAM drawing on smaller antique auto parts.
I have the original engineered drawings dated 1922
Ed DePouli
[email protected]
704-299-5276